Test Driving The Awesome New Tools In ProSelect 4
September/24/2008 ProSelect
If you haven't upgraded to ProsSelect Version 4 yet, PLEASE don't go through the upcoming prime-time portrait season without doing so! It won't take long to master the fabulous new sales tools included in this upgrade. In fact the first thing that I did when I had a few days at home was to begin working with two of the features that make this upgrade worth its weight in gold . . . gold that will find its way directly into your pocket.
The expanded Apply Custom Effect feature is one of the best sales-building time-savers out there; it allows you to apply your favorite Photoshop Actions to selected images with a simple mouse click; then, after the sale, those actions can be applied automatically to your RAW or jpg file when you do your Photoshop processing through ProSelect. This is a great time-saver.
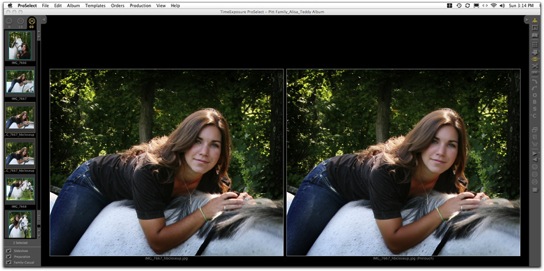
I have always taken issue with those who insist on laboriously "pretouching" every preview image. But I was thrilled when I learned from Ron Nichols how quickly you can pretouch using the Imagenomic Portraiture plugin. I have previously posted Ron's movie on that subject, and you can still view it by clicking here. As Ron explains, you can download a bunch of really helpful actions from his website, but you must own Imagenomic's Portriature plug-in to activate his four Pretouch PS Actions in ProSelect. If you don't own it already, you can save 20% by using Ron's RNDS07 code when you order. The action and the plug-in are terrific because they do their softening only on skin, so the image does not become mushy or over-softened. In the example below, the image on the left is shown as it came out of the camera, and at right it is just slightly softened by Ron's lowest-level Pretouch Action.
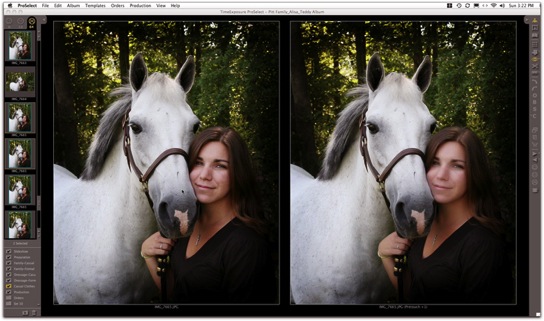
In the following example, the image at left is untouched, and I dialed up the softening a bit on the right by using Ron's Pretouch+1Action.
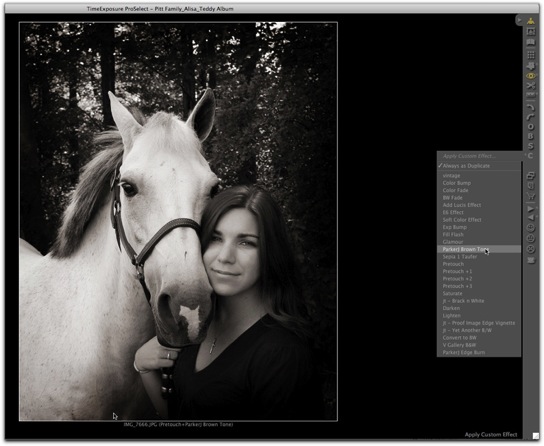
The Custom Effects feature has been part of ProSelect since I first began using it, but there were only 5 slots for Photoshop Actions, so I didn't pay much attention to it. Now that the capacity has expanded to 25 slots, and the Action-loading process is simplified to a drag-and-drop procedure, I'm having a ball with it, and I'm saving a lot of time in prepping images. If I need a little exposure bump or to lighten or darken and image or an image group, I just click on an Action, and the job is done instantly! I've also added some of my favorite effects such as this ParkerJ Brown Tone from Parker Pfister's outstanding set of PS Actions.
I couldn't wait to try the new Room View feature, and what I found out is that when it is combined with the upgraded Layouts section and Frames feature, ProSelect now offers a world of possibilities for showing images in room settings with frames around them — including composites that you can design as a template, then process automatically in Photoshop through the time-saving ProSelect Production module. When completed, the images are ready to send on to your lab for output.
I began the learning process by working with a large number of images from a very complicated session involving numerous pose groupings that easily could become a confusing sales nightmare, both for me and for the client. The lengthy session involved the daughter of long-time friends of ours; she was about to leave for college, accompanied by her dressage horse. Her parents felt that now was the perfect time for casual and formal portraits of her with the pony, as well as for a family portrait in the woods. Even with Jim and me working together to control and direct the horse, I knew we would generate many more images from this session than usual. So I was determined to make use of ProSelect's new presentation tools to help pull together this difficult presentation. As a business instructor, I am continually dismayed by how chronic over-shooters compound their felony by putting images online, expecting their clients to determine which images to choose and how to display them, without any help from the photographer who created them. In my opinion this is both lazy and unprofessional. Clients want and need your guidance, and they value your opinion.
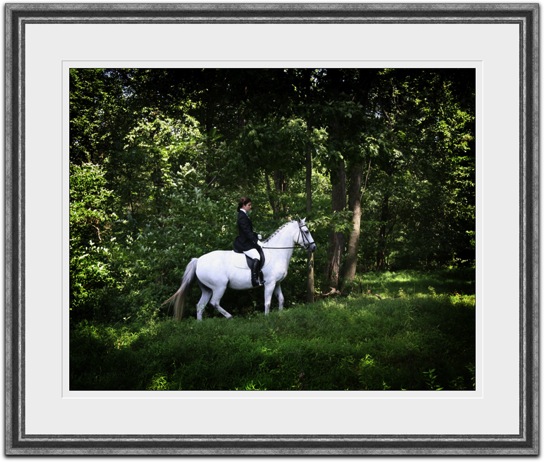
One of the ProSelect Version 4 features that is easiest to implement is the ability to add frames to images without mats . . .
. . . or you can just as easily show a matted image displayed inside the frame of your choice. The application comes with several sizes of stock frames, or you can add photographs of your favorite frames. You can even add color and dimension to mats that can be output as virtual mats, along with their images, through ProSelect Production.
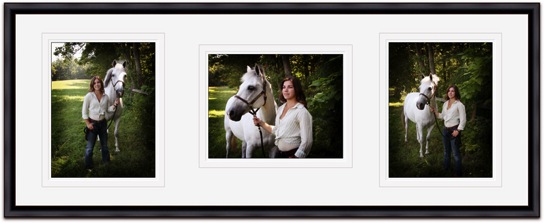
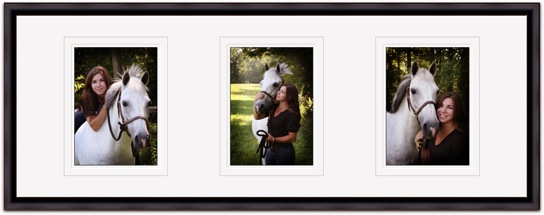
From the time that Layouts were introduced in ProSelect, I have found this feature to be a wonderful way to present secondary images in composites that literally sell themselves. Being able to add frames to these sets puts the icing on the cake!
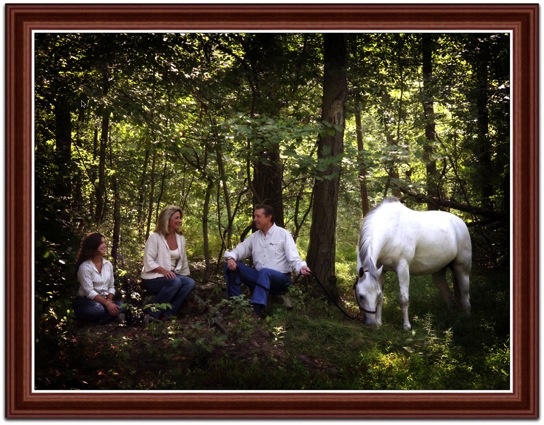
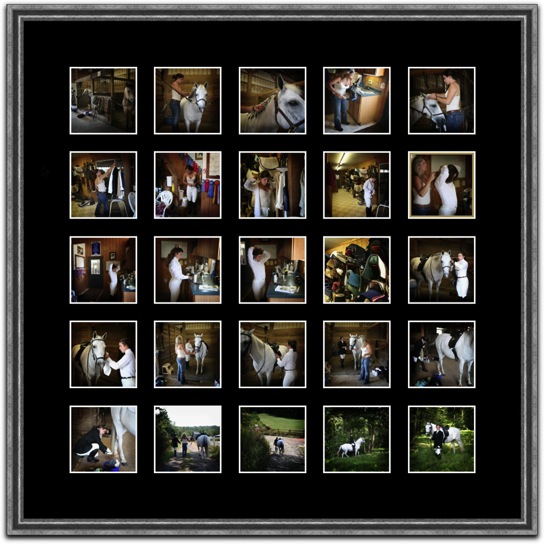
Rather than just stand around while my subject was preparing herself and her mount for a formal dressage portrait, I decided to record the lengthy step-by-step preparation process with an eye toward creating a photojournalistic product. Of course there's always the possibility of creating a book from such images, but I finally decided to present the family with the option of a framed composite. It took me only a matter of minutes to build a 25-pose 30x30-inch composite, which I can process through ProSelect's Production module and send on to the lab.
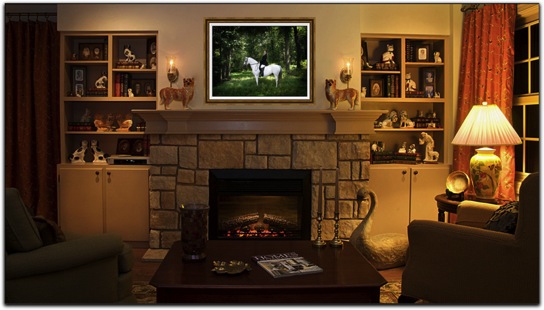
The aspect of ProSelect 4 that I most anticipated was being able to show a featured image through the new Room Views tool. I learned how it worked by using a photo of my own living room fireplace, discovering how easy it is not only to show clients various sizes of the image over the mantle, but also the impact difference between the two images that I plan to suggest would be the best options for their primary wall portrait. This way they can actually see the decorative effect of the casual pose . . .
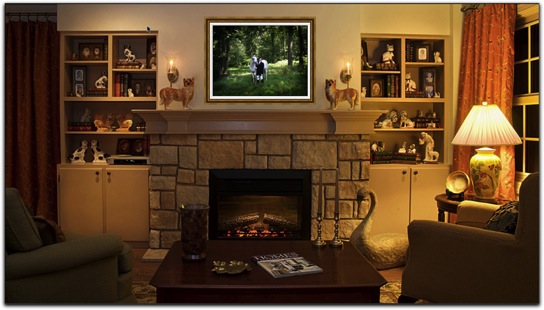
. . . versus the effect of the more formal one.
Now that I've mastered this feature, I've decided to visit the client's home and photograph their available display areas so that they can make a truly informed choice about their purchase. Honestly, these tools can make the sales process an absolute pleasure when you take the time to organize the images intelligently and with the needs of the client in mind.
While ProSelect comes with an excellent User Guide, I would recommend getting started on the learning curve by viewing the resource movies provided on the ProSelect TimeExposure.com website. Click here to get to a log-in page where you can view ProSelect Tutorial Movies. I strongly suggest that you view each of the movies in the Advanced list before you start using the application's new features. Another helpful movie that shows many of these features is one created by Ron Nichols, which I previously posted. Ron does not sell by recommendation the way I do, but you will learn a lot about both ProSelect and his sales process by clicking here.
I know that some ProSelect users still don't know how easy it is to create a downloadable slideshow through ProSelect: It's simply a matter of preparing your slide show and hitting the Export/Quicktime Slideshow command. You can see the show that I will be presenting to the family after we get back from our upcoming trip to Ireland below:
To ProSelect developer Peter Howlett and his photographer wife Fran over in Perth, Australia, a great big THANK YOU for continuing to help photographers worldwide to benefit from maximizing our sales and satisfying our clients.
Cheers!
The expanded Apply Custom Effect feature is one of the best sales-building time-savers out there; it allows you to apply your favorite Photoshop Actions to selected images with a simple mouse click; then, after the sale, those actions can be applied automatically to your RAW or jpg file when you do your Photoshop processing through ProSelect. This is a great time-saver.
I have always taken issue with those who insist on laboriously "pretouching" every preview image. But I was thrilled when I learned from Ron Nichols how quickly you can pretouch using the Imagenomic Portraiture plugin. I have previously posted Ron's movie on that subject, and you can still view it by clicking here. As Ron explains, you can download a bunch of really helpful actions from his website, but you must own Imagenomic's Portriature plug-in to activate his four Pretouch PS Actions in ProSelect. If you don't own it already, you can save 20% by using Ron's RNDS07 code when you order. The action and the plug-in are terrific because they do their softening only on skin, so the image does not become mushy or over-softened. In the example below, the image on the left is shown as it came out of the camera, and at right it is just slightly softened by Ron's lowest-level Pretouch Action.
In the following example, the image at left is untouched, and I dialed up the softening a bit on the right by using Ron's Pretouch+1Action.
The Custom Effects feature has been part of ProSelect since I first began using it, but there were only 5 slots for Photoshop Actions, so I didn't pay much attention to it. Now that the capacity has expanded to 25 slots, and the Action-loading process is simplified to a drag-and-drop procedure, I'm having a ball with it, and I'm saving a lot of time in prepping images. If I need a little exposure bump or to lighten or darken and image or an image group, I just click on an Action, and the job is done instantly! I've also added some of my favorite effects such as this ParkerJ Brown Tone from Parker Pfister's outstanding set of PS Actions.
I couldn't wait to try the new Room View feature, and what I found out is that when it is combined with the upgraded Layouts section and Frames feature, ProSelect now offers a world of possibilities for showing images in room settings with frames around them — including composites that you can design as a template, then process automatically in Photoshop through the time-saving ProSelect Production module. When completed, the images are ready to send on to your lab for output.
I began the learning process by working with a large number of images from a very complicated session involving numerous pose groupings that easily could become a confusing sales nightmare, both for me and for the client. The lengthy session involved the daughter of long-time friends of ours; she was about to leave for college, accompanied by her dressage horse. Her parents felt that now was the perfect time for casual and formal portraits of her with the pony, as well as for a family portrait in the woods. Even with Jim and me working together to control and direct the horse, I knew we would generate many more images from this session than usual. So I was determined to make use of ProSelect's new presentation tools to help pull together this difficult presentation. As a business instructor, I am continually dismayed by how chronic over-shooters compound their felony by putting images online, expecting their clients to determine which images to choose and how to display them, without any help from the photographer who created them. In my opinion this is both lazy and unprofessional. Clients want and need your guidance, and they value your opinion.
One of the ProSelect Version 4 features that is easiest to implement is the ability to add frames to images without mats . . .
. . . or you can just as easily show a matted image displayed inside the frame of your choice. The application comes with several sizes of stock frames, or you can add photographs of your favorite frames. You can even add color and dimension to mats that can be output as virtual mats, along with their images, through ProSelect Production.
From the time that Layouts were introduced in ProSelect, I have found this feature to be a wonderful way to present secondary images in composites that literally sell themselves. Being able to add frames to these sets puts the icing on the cake!
Rather than just stand around while my subject was preparing herself and her mount for a formal dressage portrait, I decided to record the lengthy step-by-step preparation process with an eye toward creating a photojournalistic product. Of course there's always the possibility of creating a book from such images, but I finally decided to present the family with the option of a framed composite. It took me only a matter of minutes to build a 25-pose 30x30-inch composite, which I can process through ProSelect's Production module and send on to the lab.
The aspect of ProSelect 4 that I most anticipated was being able to show a featured image through the new Room Views tool. I learned how it worked by using a photo of my own living room fireplace, discovering how easy it is not only to show clients various sizes of the image over the mantle, but also the impact difference between the two images that I plan to suggest would be the best options for their primary wall portrait. This way they can actually see the decorative effect of the casual pose . . .
. . . versus the effect of the more formal one.
Now that I've mastered this feature, I've decided to visit the client's home and photograph their available display areas so that they can make a truly informed choice about their purchase. Honestly, these tools can make the sales process an absolute pleasure when you take the time to organize the images intelligently and with the needs of the client in mind.
While ProSelect comes with an excellent User Guide, I would recommend getting started on the learning curve by viewing the resource movies provided on the ProSelect TimeExposure.com website. Click here to get to a log-in page where you can view ProSelect Tutorial Movies. I strongly suggest that you view each of the movies in the Advanced list before you start using the application's new features. Another helpful movie that shows many of these features is one created by Ron Nichols, which I previously posted. Ron does not sell by recommendation the way I do, but you will learn a lot about both ProSelect and his sales process by clicking here.
I know that some ProSelect users still don't know how easy it is to create a downloadable slideshow through ProSelect: It's simply a matter of preparing your slide show and hitting the Export/Quicktime Slideshow command. You can see the show that I will be presenting to the family after we get back from our upcoming trip to Ireland below:
To ProSelect developer Peter Howlett and his photographer wife Fran over in Perth, Australia, a great big THANK YOU for continuing to help photographers worldwide to benefit from maximizing our sales and satisfying our clients.
Cheers!